The official TIBCO EMS documentation has detailed the steps required to setup a functional Fault Tolerance server pair. I made a summary of the steps below for those who are in hurry.
WARNING: This is not a production configuration as it lacks of security enforcement such as ssl communication between servers. The the file system where the shared storage resides (which is NTFS) may not meet the criteria (Write Order, Synchronous Write Persistence, Distributed File Locking, Unique Write Ownership - refer to the official documentations) for Fault Tolerance. The shared storage folder in local drive is for quicky PoC only. The tibemsd.conf files may contain default parameter values that do not meet your operation scenarios.
New! -
FT Pair on NFS
New! -
FT Pair on Oracle
In scope:
- FT pair with shared state, file-based
- Inspect the propagation of a new topic into backup server when Fail-over takes place
- FT pair with sever authorization = enabled
Not in scope:
- SSL requirements
- Client configurations for FT connections
- Shared application binary folders for both participating servers
- Testing of client fail-over (it would probably not work because storage criteria are not met)
Tools:
Notepad++
DOS command line prompt
Bill of materials:
Installation of TIBCO EMS 5.1.x (1x)
tibemsd.conf (2x, 1 for primary sever, 1 for backup server)
Windows XP host (1x, we will use different listening ports for both severs so they can co-exist in the same host)
Schematic of Fault Tolerance EMS Server Pair Configuration, shared state (from the official doco).
Preparing the tibemsd.conf for the first server
1) Create a local folder in you local drive, name it "ems_ft_config"
2) Create a sub-folder under that folder, name it "datastore" (it becomes "ems_ft_config\datastore")
3) Copy tibemsd.conf from the sample folder of your TIBCO EMS installation. In my host, it is "C:\tibco\ems\5.1\samples\config"
4) Paste tibemsd.conf into "ems_ft_config", rename it to tibemsd1.conf
5) Edit tibemsd1.conf with your favorite text editor. Update the following parameters
users                   = x:\ems_ft_config\users.conf
 groups                  = x:\ems_ft_config\groups.conf
 topics                  = x:\ems_ft_config\topics.conf
 queues                  = x:\ems_ft_config\queues.conf
 acl_list                = x:\ems_ft_config\acl.conf
 factories               = x:\ems_ft_config\factories.conf
 routes                  = x:\ems_ft_config\routes.conf
 bridges                 = x:\ems_ft_config\bridges.conf
 transports              = x:\ems_ft_config\transports.conf
 tibrvcm                 = x:\ems_ft_config\tibrvcm.conf
 durables                = x:\ems_ft_config\durables.conf
 channels                = x:\ems_ft_config\channels.conf
 stores                  = x:\ems_ft_config\stores.conf


 store                   = x:\ems_ft_config\datastore


 ft_active               = tcp://your-ip-address:7224
 ft_heartbeat            = 3
 ft_activation           = 10
 ft_reconnect_timeout    = 60
6) Save the file.
7) Make another copy of tibemsd1.conf, name it tibesmd2.conf. Update the following parameters (note: replace 'x' with your drive letter)
ft_active = tcp://your-ip-address:7222
8) Save the file.
9) Open a command prompt, change directory to your EMS installation bin (in my case, it is C:\tibco\ems\5.1\bin).
10) Execute the following command
tibemsd -config x:\ems_ft_config\tibemsd1.conf
You should see the server startup traces in the stdout.
Let's examine the output.
(1) The server is started with tibemsd1.conf file
(2) It is trying to contact the server specified in the ft_active parameter, but could find the server (could be it was down, we haven't started it, or there was a connection problem to the target server.
(3) It decided to startup as active server (as opposed to 'backup server), and start listening on port 7222 as specified in the 'listen' parameter.
(4) Because it knows that itself is part of a FT pair, it performs the state recovery step.
Up to this stage, all is running as expected.
11) Open another command prompt, change directory to your EMS installation bin (in my case, it is C:\tibco\ems\5.1\bin).
12) Execute the following command
tibemsd -config x:\ems_ft_config\tibemsd2.conf
You should see the server startup traces in the stdout.
Let's examine the output.
(1) The server is started with tibemsd2.conf file
(2) It starts listening on port 7224 as specified in the 'listen' parameter of tibemsd2.conf file
(3) This time, it has started itself in standy mode because it has detected an active EMS server specified in the ft_active parameter.
On the primary server, the trace shows that the secondary server has been accepted as the standby server.
Using tibemsadmin, connect to each server and issue a command 'show server'. It provides the summary of the server, as you can see from the following images. The first server is the 'active' sever, and the second server is the 'standby server'.
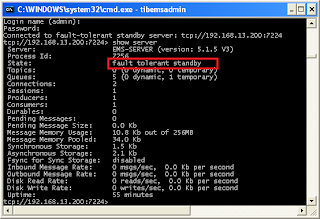 |
| Primary Server |
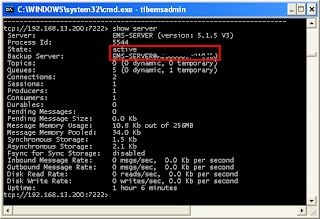 |
| Secondary Server |
Examine one of the fail-over behaviour.
We will examine the behaviour of the backup server after it re-reads the configuration. First we add a new topic into the active server by using tibemsadmin tool.
1) Open another command prompt, change directory to your EMS installation bin (in my case, it is C:\tibco\ems\5.1\bin).
2) Execute the following command to connect to the primary sever (make sure that you have this server as the active sever)
tibemsadmin -server tcp://192.168.13.200:7222 -user admin
3) Press enter when asked for password, because we don't have one
4) Create a new topic called topiccreatedin7222 by issueing the following command at the admin prompt[tcp://192.168.13.200:7222> ]
tcp://192.168.13.200:7222> create topic topiccreatedin7222
5) Shut down the active server by issuing a 'shutdown' command at the admin prompt and answer 'yes' to the confirmation question.
tcp://192.168.13.200:7222> shutdown
You will see that the active server is shutdown, and the standy server resume it's operation as the primary server.
6) Connect to the now active primary server
tibemsadmin -server tcp://192.168.13.200:7224 -user admin
7) Issue the command 'show topics' at the admin prompt
tcp://192.168.13.200:7224> show topics
You now see that the topic created in the previously active server is now served in this new instance of active server.
Enabling server authorization for TIBCO EMS Fault Tolerance pair ->
Available here.


