Revision 0.1:
Change 1:
The following changes have been made to the ParseAndTransform process.
- Add 2 output parameter to the process. They are configured as the input parameter of the 'End' activity of the process.
> empColl - This element contains a copy of the empAccumulator process variable
> outputFileName - This element contains the output filename to be used by the downstream file writer activity. The reason behind this design decision is that when a new data model output is required, a new sub-process will be created by the developer and deployed into the BW engine. Different ParseAndTransfor process responsible to produce different data model based on different xsd will cause a different XML file name to be written by the downstream writer activity.
Example: ParseAndTransform sub-process will have its output writen to a file called ConsumerXXX-UniqueID.xml. ParseAndTransform will have its output written to a file called ConsumerYYY-UniqueID.xml. These output filename will eventually be published to interested parties.
Change 2:
EmployeeDataFormat (Data Format) has been updated to contain 'Complex Element' rather than 'XML Element Reference' to demonstrate the difference between the data model of the original input file and the desired out file (employees xsd). The Data Format defines the CSV file to contain the following fields
lastname,fistname,empNum,hireDate,department,manager
-------------------------------------------------------------------
Been busy with work and done heaps of catch up with the TIBCO SOA platform. Came back from the TIBCO NOW seminar in Melbourne and got a good picture of what to expect from TIBCO product roadmap. I have to say TIBCO’s platform is nimble. They really know how to do integration and have learned a lot from their customers in specific verticals. But that is from a helicopter view. OK, let’s start.
This article is a part of the series of articles target to describe crude ‘reference implementation’ of File Gateway pattern in the book “SOA Design Patterns” by Thomas Erl.
This article explains the steps to create a file gateway that perform the following tasks.
1) A legacy system writes a batch flat-file into an inbound folder
2) The parser-transformer component polls and retrieve the flat file
3) The parser-transformer parses the data and performs data format transformation
4) The parser-transformer optionally performs data model transformation
5) The parser-transformer writes file to an outbound folder
6) The parser-transformer optionally broadcasts/triggers an event that a file is ready for consumption
To help you visualise what we are about to build, refer to
this end-state.
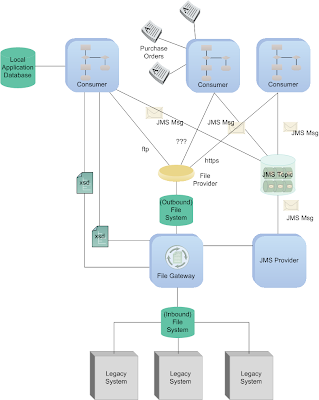 |
| The final product |
Due to the width and depth covered in this topic, this article is split into 4 parts. The first part talks about how to create a TIBCO-BW process definition to parse and transform data models.
In the second part we will be extending the parser-transformer process to write the resultant file into the outbound folder. We will also implement four more global variables to enable configuration of inbound file path, outbound file path, semaphore file extension as well as the file pattern to watch.
The third part of this article will describe the steps to create a simple file poller process and invocation of the parser-transformer process.
The fourth part of this article will look at testing and deployment of this gateway into the TIBCO BW infrastructure, some performance tuning and monitoring using TIBCO Hawk agents.
In the roadmap, one would hope to have/be able to interact with the following capabilities:
1) Publish transformation completion events to the interested parties (typically the consumers, can also be the legacy providers provided they are capable of listening to events)
2) Pluggable architecture of schema specific parsers/transformation engines, effectively supporting one source multiple target use.
3) Load balancing via TIBCO infrastructures
4) Service call-back (pattern)
5) Protocol bridging (pattern)
6) Schema Centralisation (pattern)
We will discuss the appropriateness of item 4, 5 & 6 when time permits.
The writing of this article is unrehearsed. It may and will contain errors and inaccuracies, both technically and organisationally. Your comments and corrections are very welcomed.
Here goes the first part.
Begin with the ends in mind…here is what we will get at the end of this article.

1) Create the following folders structure in the file system. This file system is a location to exchange inbound and outbound files. It can be a folder in an ftp server or a mappable folder on the NAS.

The inbound folder is for incoming files, usually file dumps performed by the legacy system. Corresponding semaphore files will also transiently exist in this folder.
The outbound folder, on the other hand, holds the parsed and transformed files for the targeted consumers.
2) Create a XML schema that defines the data structure to be handled by the parser/transformer process. We created the schema using Oracle JDeveloper, based on the EMP table from the SCOTT schema. I have to admit that this tool, like many other commercial XML tools, provides better user experience through the adoption of widely accepted visual paradigm.

3) Create a new TIBCO Designer project.
Launch the TIBCO Designer. Create a new empty project, name it as FileGateway.

4) Create a new folder to contain our BusinessWorks process. To create a new folder, right click on the root node in the Project Panel of the TIBCO Designer, select the ‘New Folder’ menu item, and a new folder with a default name ‘Folder’ will be added. Rename the folder to ‘ParseAndTransform’ directly in the Configuration Panel.

5) Import the schema of the data model output expected from this process. This schema will be referenced multiple times throughout the entire process definition. Notably in the definition of Data Format, Parse Data and other activities.
To import the schema we have created in Step 2, make sure the ParseAndTransform folder is selected. Under the Project menu, select ‘Import Resources from File, Folder, URL…’.

In the ‘Import Resource of File…’ dialogue box, select the ‘File (.xsd, .xslt, .wsdl, .*)’ as the Format.

In the ‘File:’ field, click on the binocular icon to browse for your schema file. Our file is named employees.xsd.
You should now have a schema appearing on the Designer Panel.

Double-click the schema icon, you can inspect the schema through TIBCO Designer’s schema editor. Click the ‘Overview’ button on top to see the schema overview. We are not going to make any changes through this editor throughout this project.

6) Our parser will need to know how to parse the CSV. This step involve the process of defining an activity call ‘Data Format’. Just as one would do when importing a CSV file into MS Excel, we will define the format, the delimiter character, the EOL character and other characteristic of the input flat file.
Back to the ParseAndTransform folder, in the Designer Panel, right-click and select ‘Add Resource’ à Parse à ‘Data Format’ sub-menu item.

Rename the activity to ‘EmployeeDataFormat’ and click ‘Apply’.

In the configuration panel, click on the 'Data Format' tab, we will specify the content type as 'Complex Element'.
Click on the ‘+’ button, a default ‘root’ element will be added. Rename it to 'emp'. Define the children elements as shown in the picture below.

Click the ‘Apply’ button to commit your changes.
Before we process further, let’s look at what we have done.
We have
- Created a XML schema using our preferred XML authoring tool. We called that schema ‘employees.xsd’. It contains 2 complex types and 2 elements.
- Created an empty TIBCO Designer project called FileGateway.
- Create a new folder called ParseAndTransform in the FileGateway project.
- Imported the ‘employees.xsd’ schema into the ParseAndTransform folder
- Created a Data Format that references the employees.xsd, we called this Data Format ‘EmployeeDataFormat’.
In the next step we will create a process definition that will perform the following tasks.
- Takes an input that contains filename information from an external process.
- Parses the inbound file (Parse Data activity)
- Constructs the employees collection from the parsed records (Mapper activity)
- Updates a process variable that acts as accumulator (Assign activity)
This process definition will be built with the following capabilities:
- Configurable number of records to be grouped for resource optimisation/tuning
7) Add a new process under the ParseAndTransform folder.
Click on the ParseAndTransform node on the Project Panel. One the Designer Panel, right click and select the Process à Process Definition sub-menu item.

A new process definition with a default name ‘Process Definition’ will be added. Rename the process definition to ‘ParseAndTransform’ directly in the Configuration Panel.

Define a process variable to act as an accumulator of employee records.

8) Up to this stage, we have an empty process definition. This process will not poll the file system, the polling part will be performed by the parent process, or even a separate component, depends on our design; instead, this process takes an input that specifies the fully qualified filename to be parsed. In this step, we need to specify the input parameter, and we will define this at the ‘Start’ activity of the process definition.
Double click on the ParseAndTransform process definition icon in the Designer Panel.

Click on the ‘Start’ activity icon, in the Configuration Panel, click on the ‘Output Editor’ tab.
Click the ‘+’ sign under the ‘Output Editor’ tab and name that parameter as ‘inboundFileName’. Specify the Content as ‘Element of Type’ and the Type as ‘String’. Click the ‘Apply’ button to make the changes effective.
Note: This tab is called ‘Output Editor’ because it allows one to specify the output that will be available to all downstream activities. This ‘output’ parameter will appear as ‘input’ parameter when the entire process is reference from another activity or process. We will see how this works in the coming steps.
9) Define a global variable called CHUNK_SIZE of type integer. This variable will be referenced in the ‘Group’ for grouping of records for processing. This value of this variable can be configured in the TIBCO Administrator console during the deployment and possibly would be useful for performance turning.
To define a global variable, click on the Global Variables panel. Click on the pencil icon to open the Advanced Editor. Click the ‘abc’ icon at the bottom of the Global Variables pop-up window and name that variable as ‘CHUNK_SIZE’ of type Integer. Assign it a default value of ‘3’.

We shall see the newly created variable appear in the Global Variables list together with other pre-defined variables.
10) Add the necessary activities into the process definition.
Add the ‘Parse Data’ activity.
Double click on the ParseAndTransform process definition, in the Designer Panel, right-click on the white space area to insert a Parse Data activity.

Rename the Parse Data activity to ‘ParseEmpsCSV’. In the configuration tab of configuration panel for ParseEmpsCSV activity, click on the binocular icon to select the Data Format created earlier.

Click OK. When back to the configuration tab, ensure the ‘Input Type’ field is specified as ‘File’. Click ‘Apply’ and save the project.
11) Wire the ‘Start’ and ‘ParseEmpsCSV’ activities together.
Right click on the ‘Start’ activity to select ‘Create Single Transition’ menu item. Note that the cursor pointer changes to a hairline ‘+’.

Drag a line from ‘Start’ to ‘ParseEmpsCSV’ activities to represent the direction of the transition. At this stage, there is no configuration required for this transition line.

Click on the ParseEmpsCSV activity to continue working on it. In the configuration tab, click on the binocular icon to pick the required Data Format.

Click OK. In the Input Type, select ‘File’ from the dropdown box.

Click on the input tab, map the input fields with the required process data. Two values are required. The first one, is the filename which will be mapped to the ‘inboundFileName’ of the Start activity. The second input, noOfRecords, will be mapped to the CHUNK_SIZE defined as the process variable earlier.

Enter a literal
0 into the SkipHeaderCharacters field as out CSV file starts from the first column.
The next activity in the process will be the Mapper activity. This activity in our process will perform 2 functions. First, it acts as a mapper to map the output of the Parse Data activity into the final form. The second function which is equally important is that it will perform the ‘accumulation’ of the employee records in every iteration of the group (will be discussed later) it operates in.
12) Add a Mapper activity, name it as BuildEmpsColl.
Right click on the Designer Panel to add a Mapper activity located under ‘General Activities’ menu.

Create a transition from ParseEmpsCSV into BuildEmpsColl.
In the input editor tab, define the input parameter that this activity will take.

In the input tab, we need to map 2 inputs from the process data into one employee collection. One of the process data is the output of ParseEmpsCSV activity, the other is the empAccumulator process variable. Parsed result from every iteration will be accumulated in empAccumulator process variable.
Right click on the emp element in the Activity Input pane and select ‘Duplicate’

To map the process data, expand $empAccumulator in the process data pane and drag the child node (empColl) into the first copy of emp in the Activity Input pane.

In the dialogue box, select ‘Make a copy of each ‘emp’’

Repeat the same for the output of ParseEmpsCSV activity.

In the dialogue box, select the 'For each…' option.

Click the 'Next' button.

Note that only 2 fields are automatically mapped. This is because the source file (flat file) contain different data model and even the field name are not all the same. We will need to manually map the rest.

Mapper is a powerful activity that can perform many transformation tasks. In the above example, the incoming CSV file contains 2 columns for a name, i.e. first name and last name. The output file (the xsd schema) has only one element called ename, so we need to concat the fields into one. This of course depends on the requirement. Refer to the TIBCO documentation for more details and examples.
Now we need to update the accumulator with this new value. We use the 'Assign' activity for that.
13) Add a 'Assign' activity to the process. Assign activity is under the 'General Activities' palette. Name the activity 'UpdateProcessVar'. The process variable to update is empAccumulator. Create the required transition, including the one that transition to the 'End' activity.
In the input tab, map the entire empColl into the process variable.

When asked, just specify "select 'Make a copy of each 'empColl'".
Up to now, our process definition looks like this.

We are getting there. The next step is to wrap all the activities into a group so that iteration can be performed based on group of records. This approach is optional, but will become visibly important when the file size being processed is large, such as 1GB or even 2GB.
14) Group the activities. Select the activities that we want to group. ParseEmpsCSV, BuildEmpsColl and UpdateProcessVar. Multi select can be performed by holding down the control key while selecting. Click the ‘Create a group’ icon on the tool bar.

15) Configure the group. Select the created group, in the configuration tab, select ‘Repeat-Until-True’ as the group action. Enter ‘i’ as the index name and use the following XPath expression as the condition to stop the iteration.
$ParseEmpsCSV/Output/EOF = string((true()))
The expression will cause the iteration to exit when the parser (ParseEmpsCSV) encounters the EOF character in the input file.

16) Define the process output at the 'End' activity.
Click on the 'End' activity. In the 'Input Editor' tab, add the following elements under a default root schema called 'group'. You can choose other name for this root schema, I would just accept the default name 'group'.

In the 'Input' tab, drag the $empAccumulator process variable into the empColl element in the Activity Input pane. This will be out process output. This output will be used by the downstream writer to create the XML file.
Paste the following XPath formula into the 'outputFileName' element.
concat('EMP-OUT00A-', tib:format-dateTime('yyyyMMdd-HH-mm-ss', current-dateTime()),".XML")
The first part of the output filename is hardcoded for the sake of simplicity. This is not critical as the filename convention is specific to this particular implementation of ParseAndTransform process.

Well, that is part 1.
Until then, happy SOA’ing.
Update:
Another example of parsing CSV with header and footer is now available
here.


