1) Create a new exposed service from scratch in the JDev composite composer.
2) Import an existing WSDL as an exposed service in the composite.
3) Add a new operation into the existing exposed service of a composite component.
4) Drop an existing operation from the exposed service of a composite component.
This tutorial will address scenario #3 where a new operation is required to be added to an existing composite without breaking the existing mediator plan. The task was completed using JDeveloper 11.1.1.3.0.
The steps will take us from the as-is state (call that version 1.0) into the to-be state (version 2.0). At the end, we will have a working composite component that exposes one extra WSDL operation. To the consumer, that will be the only visible change in the versioned service.
This example is based on the simple DEPT and EMP tables in the sample schema SCOTT. The as-is state contain a simple getDepartments operation which returns a department based on the dept number (deptno) passed-in by the consumer.
This paper assumes that you already have all the required tools and servers installed, up and running, ready to accept deployments. You will also need to have the sample schema SCOTT active.
As-is:


Steps:
1) Double click the database adapter on the ‘external reference’ pane.

2) Click ‘Next’

3) Keep the JDNI name and click ‘Next’.

4) Check the ‘Insert Only’ checkbox. This is to tell the database adapter to support the insert operation for the underlying tables (DEPT and EMP). Click ‘Next’.

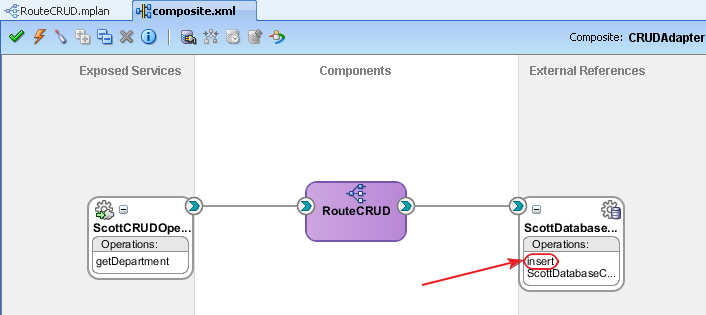
5) Click ‘Next’ all the way until you see step 10 and click ‘Finish’. You should see the following updated database adapter diagram in the composite editor.
We need to add an operation to the ‘exposed service’ which is represented by the WSDL definition ‘ScottCRUDOperations’. To achieve this, we need to use the WSDL editor to add new operation and work out the XML schema required by the new operation.
5) Double-click on the ‘ScottCRUDOperations.wsdl’ file in the project explorer.

Layout your editor tabs to look like this and drag the ‘DeptCollection’ element node into your existing portType, in this case it is ‘scottCRUD-ptt’.

You should see a new operation called ‘DeptCollectionOperation’ is added to the porttype. Clean up the operation by renaming it to reflect the actual intended action (insertDepartments), remove the output node as this is an one-way operation. For the sake of simplicity, we will ignore the fault if it happens. It is important to note that at this point of time the operation does not know anything, neither ‘select’ nor ‘insert’. It needs to be ‘wired’ up and we will do that in the Mediator designer/editor.

If you go back to the composite editor now, you will notice a new operation is created.

6) Bring up the Mediator editor by double click on the mediator component diagram.
Note that 1) The existing operation getDepartment is still there. 2) the new operation ‘insertDepartments’ is not there.


10) Click ‘Service’ as the target type.

11) In the ‘Taget Services’ pick list, expand ‘ScottDatabaseCRUD’ under the ‘References’ node. Select the service named ‘insert’. This will hook the ‘insertDepartments’ operation up with the ‘insert’ service of the database adapter.
The next step is to map the input of ‘insertDepartments’ operation to the ‘insert’ service of the database adapter.

12) Click the transform icon. Choose the ‘Create new mapper file’ option.

13) Click ‘OK’ to see the map editor.


You are done. Save the project, build and deploy. You should see 2 operations available for testing in the EM.
In the next article, I will try to examine the use of SDO (Service Data Object) on tables that do not have a parent-child constraints defined at the database level.