Showing posts with label Installation. Show all posts

Friday, August 10, 2012

Clone Solaris 11 Zone

I have come to a point where creating a Solaris 11 zone from scratch is no longer time efficient. This is a note about the method I employed to quickly clone a zone (either new zone or an existing zone).

If you have not created a zone before, here is a summary of the steps.

1) Login as root (or su - to root)

Create a zone ("stem" zone),

2) zonecfg -z originalzone "create; set zonepath=/zones/originalzone;set autoboot=true;exit"

if you already have an existing zone with other applications installed, and you just want to clone it lock, stock and barrel, do this

2.1) zonecfg -z clonedzone01 "create -t originalzone; set zonepath=/zones/clonedzone01;set autoboot=true;exit"

Before installing the zone, make sure you have the IPS repository configured. I use the "sol-11-1111-repo-full.iso", mount it and set the publisher to this repository.

3) pkg set-publisher -G "*" -g file:///media/SOL11REPO_FULL/repo/ solaris
4) pkg rebuild-index

Install the zone

4) zoneadm -z  originalzone install

Boot up the zone and login to the console at the same time

5) zoneadm -z  originalzone  boot; zlogin -C originalzone

If this is a new zone, once the zone booted up, and finished configuring the services, hit F9 to exit.

Run (or re-run if you have just finished configuring the a new zone) "sysconfig create-profile -o /tmp/sc_profile.xml". As you are now in the local zone, make sure you have access to the sc_profile.xml from the global zone and copy it into the global zone before you shutdown the originalzone. /tmp in the local zone maps to /zone/originalzone/root/tmp in the global zone.

Note that if you run the sysconfig utility in a fully configured zone, you will be prohibited from reusing the same user id and the computer name. I just enter a placeholder USERID for user name and COMPNAME for computer name fields. I have also used a bogus IP address during the configuration. Once the sc_profile.xml is generated, just repalce the tokens with valid values before feeding it to the zoneadm to clone the zone.


6) Shutdown the zone: zoneadm -z  originalzone halt

6.5) Replace the placeholders in the sc_profile.xml with meaningful values

# sed -e 's/USERNAME/admin/g' sc_profile.xml > sc_profile.xml.tmp && mv sc_profile.xml.tmp sc_profile.xml
# sed -e 's/COMPNAME/clonedzone/g' sc_profile.xml > sc_profile.xml.tmp && mv sc_profile.xml.tmp sc_profile.xml
# sed -e 's/55\.55\.55\.55/192\.168\.56\.62/g' sc_profile.xml > sc_profile.xml.tmp && mv sc_profile.xml.tmp sc_profile.xml

7) Clone the zone (the content of the zone).

# zoneadm -z clonedzone clone -c ~/sc_profile.xml originalzone

Progress being logged to /var/log/zones/zoneadm.20120811T004223Z.clonedzone.clone
Log saved in non-global zone as /zones/clonedzone/root/var/log/zones/zoneadm.20120811T004223Z. clonedzone.clone

If you want to find out what was done by the zoneadm util, have a look at the log file, you should notice that the tool actually performed a cloning of the originalzone zfs fs.

This also means that the size of the cloned zone starts with zero, as you make changes to the clonedzone, the size of the zfs fs will grow. Check this out

# zfs list | grep [original,cloned]zone$
NAME                                                       USED  AVAIL  REFER  MOUNTPOINT
rpool/zones/originalzone                              393M  93.4G    33K  /zones/originalzone
rpool/zones/clonedzone                               37.0M  93.4G    35K  /zones/clonedzone

Now boot the clonedzone and you will find that you do not need to perform the configuration and all local users, apps you created in the originalzone are still there.

Happy cloning!

Sunday, June 24, 2012

Install IBM HTTP Server in Solaris 11 zone to front WAS


Now that we have installed the IBM WebSphere Application Server and some sample applications, we will install the IBM HTTP Server to front the app server. It is a common practice to stand up a separate HTTP server instance to serve the resource provided by the app server. This web server typically resides in the tier 1 environment in a DMZ behind a tier 1 firewall facing the internet, or in a tier 1 environment facing the internal network. Application servers are usually placed in tier 2, behind a tier 2 firewall, and have access to tier 3 resources such as database servers. App servers are usually not accessible directly from the internet for security reasons. And for performance reasons and also the hosting of static pages off the filesystem, a separate web server fits the bill. In many configurations, users authentications are performed at web server tier (in collaboration with user stores such as LDAP, and through 3rd party identity solution such as SiteMinder) before the users hitting the dynamic resources serverd by the application server.

Download the IHS package from IBM website, Solaris 11 x86_64, the name of the archive is ihs.7000.solaris.x64.tar. You may install the HTTP server on the same machine as the application server, or on a totally separate machine. As explained earlier, we will install IBM HTTP server in a Solaris 11 local zone. Follow the steps here to install a clean local zone.

Deployment Architecture

The next diagram depicts a typical deployment topology of JEE-based application. Note that there are many other variants exist in production and the choice is really up to the requirements of availability, reliability and security, and also the arrangement of the other existing infrastructures such as user and credential stores, authentication solutions, authorization solutions, network architecture and infrastructures such as load balancers and implementations of app server specific cluster technologies.

Figure 1: Logical Deployment Architecture
This article implements the Tier 1 web server with IBM HTTP Server. We will only install the web server in this article.

A note about 32 bits vs 64 bits

According to the IBM official documentations, you can mix 32/64 bit HTTP servers with 64/32 bit WAS. Any to any is allowed, as long as the plug-in which resides in the HTTP server are of the same architecture (can't have 32 bit HTTP server with 64 bit plug-in, or vice versa).

If you want to install a 32 bit HTTP server on a 64 bit Linux machine (because IBM HTTP server 7 is only available in 32 bit JVM on Linux), you need to first install the ia32-libs package. (apt-get install ia32-libs for Ubuntu)

Additional notes: If you are installing IBM HTTP Server on Ubuntu systems, you may need to install ksh (Korn Shell) package as the setupadmin.sh needs it to configure the process owner of the HTTP Admin server. To install ksh, 'apt-get install ksh' on your Ubuntu. This is not needed if we are installing on Solaris 11, as in this article.

The installation process

To start the installation process, expand the archive, cd into IHS folder. Look for a file called "responsefile.txt". Peruse this file as it gives you all you need to know about silent installation. After you gone through the file, extract all the options into a separate file so we can eliminate the unnecessary comment lines.

root@websvr02:~/ihs_install/IHS# grep -e ^\-OPT responsefile.txt
-OPT silentInstallLicenseAcceptance="false"
-OPT allowNonRootSilentInstall=false
-OPT installLocation="/usr/IBM/HTTPServer"
-OPT httpPort="80"
-OPT adminPort="8008"
-OPT createAdminAuth="false"
-OPT adminAuthUser="username"
-OPT adminAuthPassword="password"
-OPT adminAuthPasswordConfirm="password"
-OPT runSetupAdmin="false"
-OPT createAdminUserGroup=true
-OPT setupAdminUser="useridname"
-OPT setupAdminGroup="groupname"
-OPT installHttpService="true"
-OPT installAdminService="true"
-OPT winServiceLogOnAs="localSystem"
-OPT winServiceUser="YOUR_USER_NAME"
-OPT winServicePassword="YOUR_PASSWORD"
-OPT winServiceStartType="automatic"
-OPT installPlugin="true"
-OPT webserverDefinition="webserver1"
-OPT washostname="localhost"

Copy or pipe the output to a separate file, name it installIHS.resp. Edit the file to look like the sample below.


#silent install
-OPT silentInstallLicenseAcceptance="true"
# do not check prereq, Sol 11 not supported 
-OPT disableOSPrereqChecking="true" 
# installation location 
-OPT installLocation="/opt/IBM/HTTPServer" 
# http server port number
-OPT httpPort="8080" 
# admin server port number
-OPT adminPort="8008"
# create admin server user, for use by WAS console
-OPT createAdminAuth="true" 
# the userid to login into the admin server
-OPT adminAuthUser="ihsadmin"
# the password of admin user
-OPT adminAuthPassword="password" 
# confirm the admin password
-OPT adminAuthPasswordConfirm="password"
# the web server name reference by WAS console
-OPT webserverDefinition="websvr02" 
# creates the Admin user and group in the host machine 
-OPT createAdminUserGroup="true"
# setup the admin user by running the setupadmin.sh
-OPT runSetupAdmin="true" 
# Admin user (the uid in Linux/Unix)
-OPT setupAdminUser="ihsadmin" 
# Admin group (the gid in Linux/Unix)
-OPT setupAdminGroup="ihsadmin" 

Lets perform the silent installation using the response file above.

# install -options installHTTP.resp -silent   

To ensure that the installation has completed successfully, look under /opt/IBM/HTTPServer/logs/install/ for the log.txt file. If the installation failed, you should be looking for the log in ~/ihslogs directory.

Sanity check

You should see the ihsadmin user and ihsadmin group are created as OS user.

root@websvr02:/opt/IBM/HTTPServer/bin# id ihsadmin
uid=101(ihsadmin) gid=100(ihsadmin)

You should also notice that a password entry has been created in the /opt/IBM/HTTPServer/conf/admin.passwd file. This is the credential used for logging into the HTTPServer admin server.

root@websvr02:/opt/IBM/HTTPServer/conf# cat admin.passwd
ihsadmin:$apr1$n/4.....$j0KP/AbsaceWBvUF.g/xz1 

Check that the owner of the configuration has been changed.


Starting the HTTP server and HTTP Admin server

Start the HTTP Admin server
To start the admin server, run the following command in the bin directory of the IHS installation.

root@websvr01:/opt/IBM/HTTPServer/bin# ./apachectl start

Start the HTTPServer
To start the http server, run the following command in the bin directory of the IHS installation.

root@websvr01:/opt/IBM/HTTPServer/bin# ./adminctl start

Check the processes and the owners


root@websvr02:/opt/IBM/HTTPServer/conf# ps -ef | grep httpd | grep -v grep
  nobody  6354  6352   0 23:44:03 ?           0:00 /opt/IBM/HTTPServer/bin/httpd -d /opt/IBM/HTTPServer -k start
  nobody  6353  6352   0 23:44:03 ?           0:00 /opt/IBM/HTTPServer/bin/httpd -d /opt/IBM/HTTPServer -k start
  nobody  6355  6352   0 23:44:03 ?           0:00 /opt/IBM/HTTPServer/bin/httpd -d /opt/IBM/HTTPServer -k start
    root  6352  4569   0 23:44:02 ?           0:00 /opt/IBM/HTTPServer/bin/httpd -d /opt/IBM/HTTPServer -k start
    root  6358  4569   0 23:44:07 ?           0:00 /opt/IBM/HTTPServer/bin/httpd -f /opt/IBM/HTTPServer/conf/admin.conf
    root  6359  6358   0 23:44:07 ?           0:00 /opt/IBM/HTTPServer/bin/httpd -f /opt/IBM/HTTPServer/conf/admin.conf
ihsadmin  6360  6358   0 23:44:07 ?           0:00 /opt/IBM/HTTPServer/bin/httpd -f /opt/IBM/HTTPServer/conf/admin.conf

Note that the httpd processes for the HTTP server is running as 'nobody'. It is a good security practice to change this to a specialized user meant to run the process, in our case is the 'ihsadmin'. Edit the httpd.conf and change the lines from

User nobody
Group nobody

to

User ihsadmin
Group ihsadmin

Do the same for conf/admin.conf file. The admin server must be started with ihsadmin user because it needs to write to the files...

Visit the HTTP server page and the Admin Server Page

By now we have 2 instances of webservers running, one for HTTP server and other for Admin server. Trying hitting the HTTP server at the port number we specified earlier (if you forgot this number, go look up the httpd.conf file), in our case it was 8080.

You should see something like this.


Trying hitting the Admin server page at http://websvr01:8008/wasadmin, you should be presented with a login screen. If you try to login by using the credential "ihsadmin"/"password" you would get this error.


This is because the Admin server is meant to be log-in from the WebSphere Application Server console, and automation is performed from there. HTTP Admin server is not meant to be an interactive website.

In the next article, we will manually set up the Websphere Application Server plugin in this HTTP Server instance to act as a reverse proxy into the WAS.

Cheers,


Wednesday, June 20, 2012

Install SamplesGallery in IBM Websphere Application Server

Alright, the previous article discussed the steps to install an IBM WAS in silent mode. By default, the installed instance is without the sample applications.

(Update: To install a new instance of WAS that includes SamplesGallery, you can add -OPT feature="samplesSelected", into the response file, however, this also requires you to provide the -OPT samplesPassword="aPassword" option.)

To install the sample applications (referred to as SamplesGallery in the IBM documentation), we need to run the install script once again, this time with a set of different options in the response file.

Create the following response file in your /WAS folder of your un-tar'ed installation archive.

# cat > addSamples.resp << EOF
-OPT silentInstallLicenseAcceptance="true"
-OPT disableOSPrereqChecking="true"
-OPT installType="addFeature"
-OPT feature="samplesSelected"
-OPT installLocation="/opt/IBM/WebSphere/AppServer"
-OPT traceLevel="INFO"
EOF

Make sure you stop all servers before carry out the installation of samples.
Install the samples

# ./install -options addSamples.resp -silent

Check the log file to see if the installation is successful.

# cat /opt/IBM/WebSphere/AppServer/logs/install/log.txt

You should see these 2 lines ending the log file immediately after your installation exits.

(Jun 19, 2012 1:07:40 PM), Process, com.ibm.ws.install.ni.ismp.actions.SetExitCodeAction, msg1, CWUPI0000I: EXITCODE=0
(Jun 19, 2012 1:07:40 PM), Process, com.ibm.ws.install.ni.ismp.actions.ISMPLogSuccessMessageAction, msg1, INSTCONFSUCCESS

Inspect the directory where the samples are installed. It is located in [was_install_dir]/samples

root@ubuntu12svr01:/opt/IBM/WebSphere/AppServer/samples# ls
bin  javadoc  lib  src

As an exercise, cd into lib/ and look at all available ear's. They are all the samples you can deploy into your profiles. The SamplesGallery is of our particular interest because it is a 'Gallery' that introduces the apps and provides some basic instructions on how to install them.

Now we need to install SamplesGallery app into our server1 of appsvr01 profile (created in this article). Once installed, the 'Gallery' can be access via URL http://server:9080/WSsamples.

You can either do this using the install script under the bin/ folder of the samples directory, or do this using the web admin console of profile appsvr01. Lets use command line to install SamplesGallery and use the web admin console to install others.

Using the command line.

root@ubuntu12svr01:/opt/IBM/WebSphere/AppServer/samples/bin# ./install.sh -profileName appsvr01 -server server1 -samples SamplesGallery
WASX7357I: By request, this scripting client is not connected to any server process. Certain configuration and application operations will be available in local mode.
WASX7303I: The following options are passed to the scripting environment and are available as arguments that are stored in the argv variable: "[-server, server1, -samples, SamplesGallery]"

---------------------------------------------------------------
              Command parameters
---------------------------------------------------------------
 Command:
                        configure & install
 Scope:
    cell                ubuntu12svr01Node01Cell
    node                ubuntu12svr01Node01
    server              server1
 Samples:
                        SamplesGallery
---------------------------------------------------------------

SAMP INFO: SamplesGallery was not configured because it does not have resources to configure.

************* Install Samples Gallery *************************

---------------------------------------------------------------
              Install application
---------------------------------------------------------------
 Scope:
    node                ubuntu12svr01Node01
    server              server1
 EAR:
    name                /opt/IBM/WebSphere/AppServer/samples/lib/SamplesGallery/SamplesGallery.ear                                                                                            
    application         SamplesGallery
    destination         $(APP_INSTALL_ROOT)/$(CELL)
    usedefaultbindings  true
    noejbdeploy         true
---------------------------------------------------------------

ADMA0073W: Custom permissions are found in the [(com.ibm.websphere.security.WebSphereRuntimePermission AdminPermiss                                                                           ion)] policy file. Custom permissions can compromise the integrity of Java 2 Security.
WASX7327I: Contents of was.policy file:
 //
// WebSphere Application Security Policy for SamplesGallery.ear
//

// Required to access the WAS Admin API's.
grant codeBase "file:${application}" {
  permission java.io.FilePermission "${/}QIBM/ProdData${/}Java400${/}SamplesProperties.xml", "read";
  permission java.io.FilePermission "${was.install.root}${/}samples${/}config", "read";
  permission java.io.FilePermission "${was.install.root}${/}samples${/}config${/}*", "read";
  permission java.io.FilePermission "${was.install.root}${/}properties${/}*", "read";
  permission com.ibm.websphere.security.WebSphereRuntimePermission "AdminPermission";
  permission javax.management.MBeanPermission "*", "queryNames,getMBeanInfo,invoke";
};

ADMA5016I: Installation of SamplesGallery started.
ADMA5058I: Application and module versions are validated with versions of deployment targets.
ADMA5005I: The application SamplesGallery is configured in the WebSphere Application Server repository.
ADMA5053I: The library references for the installed optional package are created.
ADMA5005I: The application SamplesGallery is configured in the WebSphere Application Server repository.
ADMA5001I: The application binaries are saved in /opt/IBM/WebSphere/AppServer/profiles/appsvr01/wstemp/Script13804e                                                                           cf838/workspace/cells/ubuntu12svr01Node01Cell/applications/SamplesGallery.ear/SamplesGallery.ear
ADMA5005I: The application SamplesGallery is configured in the WebSphere Application Server repository.
SECJ0400I: Successfully updated the application SamplesGallery with the appContextIDForSecurity information.
ADMA5005I: The application SamplesGallery is configured in the WebSphere Application Server repository.
CWSAD0040I: The application SamplesGallery is configured in the Application Server repository.
ADMA5113I: Activation plan created successfully.
ADMA5011I: The cleanup of the temp directory for application SamplesGallery is complete.
ADMA5013I: Application SamplesGallery installed successfully.

SAMP INFO: The install command for SamplesGallery completed successfully.

---------------------------------------------------------------
              Save
---------------------------------------------------------------

SAMP INFO: The save command for SamplesGallery completed successfully.

---------------------------------------------------------------
              Summary
---------------------------------------------------------------
 The following samples were configured and installed successfully:

    SamplesGallery

---------------------------------------------------------------
root@ubuntu12svr01:/opt/IBM/WebSphere/AppServer/samples/bin#

There you have it, the SamplesGallery application was installed successfully. Lets fire up the web browser and inspect the installed application at http://server-ip:9080/WSsamples you should see something like this.


As you can see, the 'gallery' provides command line instructions to install the app. We will install Plants By WebSphere using admin console.

Steps:
1) Log in to the web console, browse to the 'Application' section on the left hand menu, click on 'New Application then 'New Enterprise Application' on the right hand pane.


2) Browse to the path for 'Plants By WebSphere' ear file.


3) Select and click ok


4) Click 'Next' and choose 'Fast path'. Leave everything else to default.


5) Click 'Next'. Select all modules to map to the 'server1'


6) Click 'Next'. Select all modules to map to the default virtual host. We have only one virtual host here because we haven't created any other.


7) Click 'Next'. Review the summary and click 'Finish'.


8) Click 'Save' link in the resultant page to save the new server configuration. The is the last step of the installation of the application.


9) Locate the newly install application in the application list. Start the application.


10) Point your browser to http://server-ip:9080/PlantsByWebSphere, you should be presented with this page.


Unfortunately, the installation of PlantsByWebSphere using web console is far from complete as we are still missing whole other resources such as mail provider, authentication provider, JDBC provider, data source, so don't expect this app to fully work until we configured those. It is probably much easier to install the PlantsByWebSphere by command line.


# sh /opt/IBM/WebSphere/AppServer/samples/bin/install.sh -samples PlantsByWebSphere

I thought this article would be a short one, but look what I have done...

Cheers,

Monday, June 18, 2012

Install and Uninstall IBM Websphere Application Server 7

This article describes how to install and uninstall an IBM Websphere Application Server 7 on a Ubuntu 12.04 64 bit server. Between the installation and uninstallation processes, we will also start an instance of the server in the profile we created, just to see it in action.

Most of the examples on the internet show you how to install WAS using GUI, but if you want to install the WAS on a Ubuntu server that doesn't come with xorg-server, then you might need to do some internet digging. There are numerous posts out there providing hints but I had to piece them up together to make the procedure work in my environment.

I am not great a fan of having my servers to be able to support GUI applications so I will not install the xorg-server package. Your preference may vary.

For that reason I will be performing a silent installation of IBM WAS 7.

What we need in order to perform a silent installation is the following:
- IBM WAS 7 software package
- Ubuntu 12.04 64-bit server installation
- Putty
- A response file for silent installation
- root access to the Ubuntu server

At the end of the install, we will have created a profile called 'appsvr01' and a default server called 'server1'   using default ports, when we use the following response file.

-OPT silentInstallLicenseAcceptance="true"
-OPT disableOSPrereqChecking="true"
-OPT installType="installNew"
-OPT profileType="standAlone"
-OPT feature="noFeature"
-OPT PROF_enableAdminSecurity="true"
-OPT PROF_adminUserName="wasadmin"
-OPT PROF_adminPassword="password"
-OPT PROF_profileName="appsvr01"
-OPT PROF_defaultPorts="true"
-OPT installLocation="/opt/IBM/WebSphere/AppServer"
-OPT traceLevel="INFO"

The options are self-explanatory. Due to the fact that Ubuntu is not a supported platform to run WAS, the 'disableOSPrereqChecking="true"' is necessary.

It is not necessary to pre-create the installation directory. As long as the installation process has the privilege to create the folder, we are ok.

Before we start, there is this little subtlety that we need to address. If you execute the command "ls -al `which sh`" you will see that the /bin.sh is actually pointing to a binary called 'dash'.

~# ls -al `which sh`
lrwxrwxrwx 1 root root 4 Jun  7 20:49 /bin/sh -> dash

We need to re-link the/bin/sh to /bin/bash as the default symbolic link of sh in Ubuntu is pointing to dash. There are numerous posts on the internet talked about this. Won't worry about why it is so, just interested to install the IBM WAS. Fix the sh sym link issue.

cd /bin
unlink sh
ln -s /bin/bash sh

Installation Steps:
1) Untar the IBM Websphere Application Server 7 archive.
# tar -xzvf was.7000.wasdev.nocharge.linux.amd64.tar.gz


2) Create a responce file for silent installation
# cat > responce.text << EOF
-OPT silentInstallLicenseAcceptance="true"
-OPT disableOSPrereqChecking="true"
-OPT installType="installNew"
-OPT profileType="standAlone"
-OPT feature="noFeature"
-OPT PROF_enableAdminSecurity="true"
-OPT PROF_adminUserName="wasadmin"
-OPT PROF_adminPassword="password"
-OPT PROF_profileName="appsvr01"
-OPT PROF_defaultPorts="true"
-OPT installLocation="/opt/IBM/WebSphere/AppServer"
-OPT traceLevel="INFO"
EOF

It is also worth noting that in the WAS directory in the expanded installation archive, there is a sample response file named "responsefile.base.txt". Have a look at this file, it should give you a good idea of what options are supported without needing to read through thousands of pages of documents.

3) cd to WAS directory and execute the install.sh with the following arguments
# ./install -is:javaconsole -options responce.text -silent
Or
# install -options responce.text -silent -log # !/root/was_install_log.txt  @ALL

to log all installation messages.


The "-is:javaconsole" argument tells the installer to print the output to stdout. Unfortunately, on my server, this doesn't work as it gives this warning message and terminates the installation process :-(

WARNING: could not write using log service: java.lang.IllegalStateException: proxy has been closed

I had to remove the argument, clean the installation directory and re-run the installation for a successful outcome.

4) During the installation process, you could watch the progress by tail-ing the log file located in ~/waslogs directory. (In the first-time installation, a temporary log file directory is always created in the home directory of the current user)

# tail -f ~/waslogs/log.txt
(Jun 18, 2012 11:47:17 AM), Process, com.ibm.ws.install.ni.ismp.mediaspanning.InstallNIFMaintenanceMediaSpanning, msg1, Installing component: wccm.services.pme, percent complete: 89%
(Jun 18, 2012 11:47:17 AM), Process, com.ibm.ws.install.ni.ismp.mediaspanning.InstallNIFMaintenanceMediaSpanning, msg1, Installing component: webcontainer, percent complete: 89%
(Jun 18, 2012 11:47:17 AM), Process, com.ibm.ws.install.ni.ismp.mediaspanning.InstallNIFMaintenanceMediaSpanning, msg1, Installing component: webservices, percent complete: 89%
(Jun 18, 2012 11:47:18 AM), Process, com.ibm.ws.install.ni.ismp.mediaspanning.InstallNIFMaintenanceMediaSpanning, msg1, Installing component: websvcs.admin.impl, percent complete: 89%
(Jun 18, 2012 11:47:18 AM), Process, com.ibm.ws.install.ni.ismp.mediaspanning.InstallNIFMaintenanceMediaSpanning, msg1, Installing component: websvcs.admin, percent complete: 89%
(Jun 18, 2012 11:47:18 AM), Process, com.ibm.ws.install.ni.ismp.mediaspanning.InstallNIFMaintenanceMediaSpanning, msg1, Installing component: websvcs, percent complete: 89%
(Jun 18, 2012 11:47:19 AM), Process, com.ibm.ws.install.ni.ismp.mediaspanning.InstallNIFMaintenanceMediaSpanning, msg1, Installing component: webui.webservices.admin, percent complete: 90%
(Jun 18, 2012 11:47:19 AM), Process, com.ibm.ws.install.ni.ismp.mediaspanning.InstallNIFMaintenanceMediaSpanning, msg1, Installing component: webui.webservices.policyset, percent complete: 90%
(Jun 18, 2012 11:47:19 AM), Process, com.ibm.ws.install.ni.ismp.mediaspanning.InstallNIFMaintenanceMediaSpanning, msg1, Installing component: webui.webservices.trust, percent complete: 90%
(Jun 18, 2012 11:47:19 AM), Process, com.ibm.ws.install.ni.ismp.mediaspanning.InstallNIFMaintenanceMediaSpanning, msg1, Installing component: webui, percent complete: 90%

5) Take note of the the last line of the installation log, you should see an exitcode = 0.

(Jun 18, 2012 12:18:02 PM), Process, com.ibm.ws.install.ni.ismp.actions.SetExitCodeAction, msg1, CWUPI0000I: EXITCODE=0

The installation takes about 5 minutes to complete on my i5-3550 machine.

By now, the installation has been completed successfully. Lets examine the installation. First, start the default server 'server1' of our profile appsvr01.

To start the server:
1) cd to the [was_install_dir]/profile/appsvr01/bin
2) execute the startServer.sh script with "server1" as the argument. "server1" is the default server of a profile.

root@ubuntu12svr01:/opt/IBM/WebSphere/AppServer/profiles/appsvr01/bin# ./startServer.sh server1
ADMU0116I: Tool information is being logged in file
          /opt/IBM/WebSphere/AppServer/profiles/appsvr01/logs/server1/startServer.log
ADMU0128I: Starting tool with the appsvr01 profile
ADMU3100I: Reading configuration for server: server1
ADMU3200I: Server launched. Waiting for initialization status.
ADMU3000I: Server server1 open for e-business; process id is 29695

The application server instance server1 is now started. The default secured listener port of this instance is 9043, try hitting https://server-ip:9043/admin yields the following.


Just add the exception and tell the browser to connect to the server, the following log-in screen will be displayed.


Enter the username and password you specified earlier in the responce.text file and login. Voila you are in!


As far as the installation goes, it has been successful.


If you want to repeat the exercise, just follow the following steps to uninstall the entire installation, in silent mode.

Steps to uninstall:
1) Stop all servers
2) cd to [was_install_dir]/uninstall/
3) execute the uninstall script with the '-silent' argument

root@ubuntu12svr01:/opt/IBM/WebSphere/AppServer/uninstall# ./uninstall -silent

4) After the script exits, delete the entire IBM directory as well as a hidden directory ".ibm" in the /opt.
5) Delete the ~/waslogs directory, too.


To install the SamplesGallery that comes together with WAS, follow this article.


That is it. Install, start server, stop server, uninstall. For the fun of it.

Cheers,

Thursday, May 24, 2012

A basic DNS server in Windows 2008 R2

Alright, we will quickly stand up an instance of Domain Name System server in Windows 2008 R2. This is going to be an internal DNS server meant to be the master for all internal zones and hosts records. At this point, we are also not integrating this DNS with the Active Directory Domain Services. There will not be caching, no forwarding nor is it located in the DMZ. The DNS server could however support the access from the internal facing web tier through a forwarder.

Under Windows 2008 R2, majority of the services are exposed via a construct called 'Role'. Each role  encompasses one or more role services, and their corresponding database, collectively delivers a capability commonly required in an enterprise infrastructure. For example, the Remote Desktop Services role, comprised of a set of services such as Remote Desktop Session Host, Remote Desktop Gateway, Remote Desktop Web Access and others which can be optionally included.

In the case of DNS, the role contains only one role service, that is the Domain Name Service.

For the sake of completeness, first make sure we have assigned a static IP address to the Windows 2008 R2 server. If you server is multi homed, you need to ensure every network interface is configured with static IP address.

To install DNS server, we start with installing the DNS role using the Server Manager Management Console.

Steps to add DNS role in Windows 2008 R2
1) In the run menu, enter ServerManager.msc and press enter. A MMC (Microsoft Management Console) will be launched.


2) Under the 'Roles' node in the tree, click 'Add Role'.


3) Check the 'DNS Server' role and click 'Next'


4) If you want to learn more about DNS, read all text and links provided in this page. They are sufficient to provide a good overview of DNS offering in Windows 2008 R2 platform. Click 'Next' if you are in a hurry.


5) Click 'Install' and when the installation finish successfully, click on 'Close'.


6) You will see in the Server Manager console the installed role and the DNS server status.


After the DNS role is installed, you will be able to create a DNS zone that fits your administrative purpose. In our example, I will create a zone call web host zone and the TLD is lab.keinjuan.com.au.


7) Click on 'Go to DNS server' to further configure the service.


8) Expand the tree menu to get to the 'Forward Lookup Zones' leave. Right click and select the 'New Zone...' sub-menu. A wizard will show itself.


9) Click 'Next', select 'Primary Zone', and click 'Next' again to specify a zone name. You will have to make one up. For a flat namespace, not much thought is needed. I have chosen the following naming:

in.lab.keinjuan.org


Short explanation:
  • The 'in' part refers to 'internal' or my intranet.
  • The 'lab' indicates that this is part of my laboratory. I may have something in the future call 'kitch' for my kitchen appliances such as rice cooker, fridge and so forth. Or I will omit it for my real 'production' elements.
  • The 'keinjuan.org' is my unofficial domain name. Doesn't not exist on the internet, doesn't matter.


10) Accept the default 'Do not allow dynamic update'. We don't need that sophistication, we will add the DNS entries manually through the console.


11) Finally click on the 'Finish' button to start installation.


12) Upon the completion, the Server Manager console will display the status of the new DNS you have just created.


Lets add some A type records to resolve our iPlanet webserver and the global zone it resides in. The hostnames and their corrresponding IPv4 IP addresses are as follow:

13) Right click on the newly created forward lookup zone (in.lab.keinjuan.org)


14) In the dialog box, enter the host name in the 'Name' field, and the corresponding IP address in the 'IP address' field. If you enter an IPv4 IP address here, you will get a 'A' record, and a 'AAAA' record when you entered a valid IPv6 address.


I have configure a test IPv6 AAAA record and 2 'A' records for the Solaris global zone as well as the local zone.

15) Test your DNS server by querying the entries using nslookup command from the command prompt, in the DNS box itself. This does not require a connectivity to the hostname being queried at this point of time. Just make sure your DNS server entry in the IP configuration of your server is 127.0.0.1 (localhost).


The nslookup results for each records in the DNS.


C:\Users\Administrator.DC-PRIM>nslookup websvr-g01.in.lab.keinjuan.org
Server:  localhost
Address:  127.0.0.1

Name:    websvr-g01.in.lab.keinjuan.org
Address:  192.168.1.2

C:\Users\Administrator.DC-PRIM>nslookup websvr01.in.lab.keinjuan.org
Server:  localhost
Address:  127.0.0.1

Name:    websvr01.in.lab.keinjuan.org
Address:  192.168.1.3

C:\Users\Administrator.DC-PRIM>nslookup anIPv6Host.in.lab.keinjuan.org
Server:  localhost
Address:  127.0.0.1

Name:    anIPv6Host.in.lab.keinjuan.org
Address:  2001:db8:85a3::8a2e:370:7334


You can also create a reverse lookup zone for the PTR record so you can lookup the hostname by IP address. Play with it.

That is all. In the next article we will look at hooking up the websvr-g01 and websvr01 to this DNS server and browser the webserver using the hostname from the DNS server.

Cheers,


Friday, May 11, 2012

iPlanet in a Solaris 11 zone (Express installation)

Update: iPlanet 7.0.15 is now available for download. The file name is 145844-08.zip. The unzip instruction will be slightly different from what described here.

In the previous article I wrote about creating a Solaris 11 zone. This article will explain the steps to install iPlanet Web Server 7.0.14 in the zone.

1) Obtain a copy of iPlanet Web Server from Oracle website, the file name is Oracle-iPlanet-Web-Server-7.0.14-solaris-x86.zip. Get the update 14 here. Save the downloaded file into a directory that is accessible from the non-global zone. Best way is to place the file into a NFS share that can be accessed from the non-global zone.
2) Login to the local zone as non-root and copy the file into a temp folder.

admin@websvr01:~$ scp admin@192.168.1.2:~/Oracle-iPlanet-Web-Server-7.0.14-solaris-x86.zip .
The authenticity of host '192.168.1.2 (192.168.1.2)' can't be established.
RSA key fingerprint is cf:b0:3d:35:a5:be:4a:57:0b:4a:5e:64:94:96:66:1e.
Are you sure you want to continue connecting (yes/no)? yes
Warning: Permanently added '192.168.1.2' (RSA) to the list of known hosts.
Password:
Oracle-iPlanet-Web-S 100% |*****************************|   160 MB    00:06   
admin@websvr01:~$


3) Unzip the file. You may need to perform unzip twice because the setup executable is inside a zip file after the first unzip.

admin@websvr01:~$ pwd
/home/admin
admin@websvr01:~$ ls
Oracle-iPlanet-Web-Server-7.0.14-solaris-x86.zip

admin@websvr01:~$ unzip Oracle-iPlanet-Web-Server-7.0.14-solaris-x86.zip 
Archive:  Oracle-iPlanet-Web-Server-7.0.14-solaris-x86.zip
   creating: 145844-07/
 extracting: 145844-07/Oracle-iPlanet-Web-Server-7.0.14-solaris-x86.zip  
  inflating: 145844-07/README.145844-07  
  inflating: 145844-07/LEGAL_LICENSE.TXT  
  inflating: 145844-07/145844-07.html  
admin@websvr01:~$ 
admin@websvr01:~$ ls
145844-07
Oracle-iPlanet-Web-Server-7.0.14-solaris-x86.zip
admin@websvr01:~$ cd 145844-07/
admin@websvr01:~/145844-07$ unzip Oracle-iPlanet-Web-Server-7.0.14-solaris-x86.zip 
admin@websvr01:~/145844-07$ ls -la
total 329601
drwxr-xr-x   4 admin    staff         10 May 11 21:36 .
drwxr-xr-x   4 admin    staff          7 May 11 21:33 ..
-rw-r--r--   1 admin    staff       8640 Feb 19 17:25 145844-07.html
-r--r--r--   1 admin    staff      18775 Sep 18  2010 LEGAL_LICENSE.TXT
drwxr-xr-x   2 admin    staff          3 Feb 14 17:08 Legal
-rwxr-xr-x   1 admin    staff    168513779 Feb 14 22:42 Oracle-iPlanet-Web-Server-7.0.14-solaris-x86.zip
-rw-r--r--   1 admin    staff       6758 Feb 19 17:25 README.145844-07
-rw-r--r--   1 admin    staff        786 Feb 14 17:08 README.txt
drwxr-xr-x   3 admin    staff         15 Feb 14 18:27 WebServer
-rwxr-xr-x   1 admin    staff      34304 Feb 14 17:08 setup
admin@websvr01:~/145844-07$ 


We are going to install the web server with 'admin' user rather than the 'root'. Run the setup and accept all default answers, the only thing you need to specify is the admin server password. The installer will detect if you have an X11 environment to bring up the GUI otherwise it will fall back to the console mode. So don't bother specify any command-line option for the setup command.


admin@websvr01:~/145844-07$ ./setup

Welcome to the Oracle iPlanet Web Server 7.0.14 installation wizard.

Copyright (c) 2007, 2010, Oracle and/or its affiliates. All rights reserved.
Oracle and Java are registered trademarks of Oracle and/or its affiliates.
Other names may be trademarks of their respective owners.

You will be asked to specify preferences that determine how Oracle iPlanet Web
Server 7.0.14 is installed and configured.

The installation program pauses as questions are presented so you can read the
information and make your choice. When you are ready to continue, press Enter
(Return on some keyboards).

Some questions require that you provide more detailed information. Some
questions also display default values in brackets []. For example, yes is the
default answer to the following question:

   Are you sure? [yes]

To accept the default, press Enter.

To provide a different answer, type the information at the command prompt and
then press Enter.

Hit enter to continue, accept default value for the Installation Directory, which will be /home/{user}/oracle/webserver7. At the Select Type of Installation, press enter to accept Express installation option. Accept the default Administrator user name [admin] and proceed to specify your password for this web server Administrator account. Accept the default [yes] when asked to install the server components. Hit Enter again to start installing.

When the progress indicator hits 100%, your installation is complete.

Installing Oracle iPlanet Web Server
|-1%--------------25%-----------------50%-----------------75%--------------100%|
Installation Successful.

Refer to the installation log file at:
/home/admin/oracle/webserver7/setup/install.log for more details.

Next Steps:

- You can access the Administration Console by accessing the following URL:
https://websvr01:8989
admin@websvr01:~/145844-07$ 


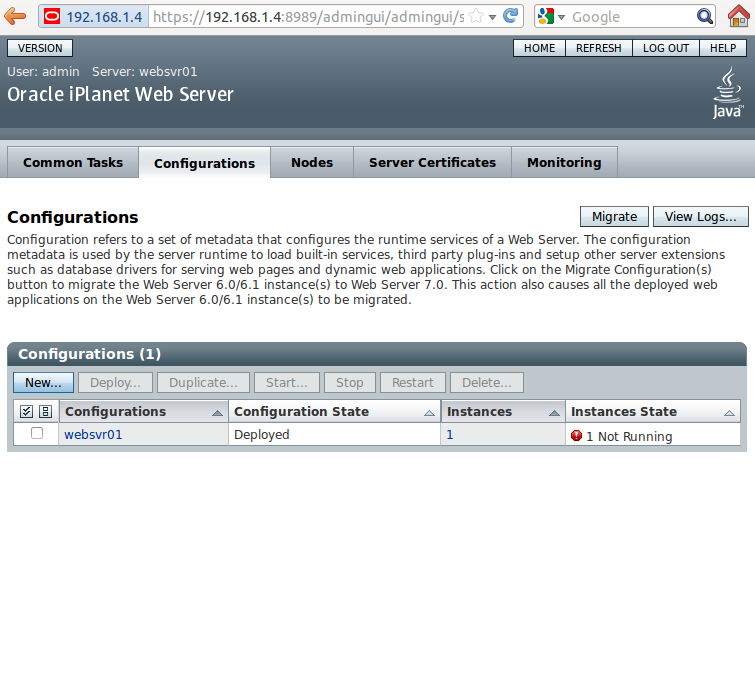
Try accessing https://websvr01:8989 you should see the Web Server Admin Console login screen.


Try logging in using the credential you created during installation; User Name=admin and Password=yourpassword you should see the configuration main screen.


The installation procedure has actually created an instance of a virtual server called 'websvr01' (or your hostname), but would not start it. You need to start it if you want to see how it look for the virtual server.

To start the virtual server, either use command line:

admin@websvr01:~$ cd ~/oracle/webserver7/https-websvr01/bin/
admin@websvr01:~/oracle/webserver7/https-websvr01/bin$ ./startserv 
Oracle iPlanet Web Server 7.0.14 B02/13/2012 21:44
info: CORE5076: Using [Java HotSpot(TM) Server VM, Version 1.6.0_24] from [Sun Microsystems Inc.]
info: HTTP3072: http-listener-1: http://websvr01:8080 ready to accept requests
info: CORE3274: successful server startup
admin@websvr01:~/oracle/webserver7/https-websvr01/bin$ 

Or through the admin console, go to the configuration->instance tab and start the server there.


Browse to the http://websvr01:8080 you should see your new shiny iPlanet landing page.


Well that is it, an iPlanet (formerly Sun Java Web Server) installed in a Solaris 11 zone.

Cheers,

Thursday, May 10, 2012

Bare Minimal Solaris 11 Zone

Creation and administration of local zones on Solaris 11 has become simpler since its public release in Solaris 10. This short article demonstrates the minimal steps required to create your own zone(s) in a global-zone.

1 Create the zone
First what you need is a running Solaris 11 installation, either on VMware, VirtualBox or running on native hardware. I used Oracle VirtualBox in this demonstration.

Log in with the id you created during the Solaris 11 installation. su to root as you may need more than a root role to complete the creation of a zone.

In its simplest form, a zone can be had with the following command:

# zonecfg -z webzone01 "create;set zonepath=/zones/webzone01;exit"

1.1 sub-commands explained

create: This creates a Solaris 11 zone called 'webzone01'

set zonepath=/zones/webzone01: This specifies the storage of the zone in a ZFS pool visible to the global zone.

exit: Exits the zonecfg configuration mode (and finishes up).

There are other configurations involved during zone creation. See man zonecfg (1M).

1.2 List the newly created zone

# zoneadm list -cv


  ID NAME             STATUS     PATH                           BRAND    IP   
   0 global           running    /                              solaris  shared
   - webzone01        configured /zones/webzone01               solaris  excl 
See man zoneadm (1M) for more infomation.

1.2 The resultant 'webzone01' zone
Use the following command to inpect the configuration of the newly created zone.

# zonecfg -z webzone01 info

zonename: webzone01
zonepath: /zones/webzone01
brand: solaris
autoboot: false
bootargs:
file-mac-profile:
pool:
limitpriv:
scheduling-class:
ip-type: exclusive
hostid:
fs-allowed:
anet:
 linkname: net0
 lower-link: auto
 allowed-address not specified
 configure-allowed-address: true
 defrouter not specified
 allowed-dhcp-cids not specified
 link-protection: mac-nospoof
 mac-address: random
 mac-prefix not specified
 mac-slot not specified
 vlan-id not specified
 priority not specified
 rxrings not specified
 txrings not specified
 mtu not specified
 maxbw not specified
 rxfanout not specified

The highlighted fields are those we specified during creation, the rest are default values. The 'anet' and 'ip-type' resource types deserve another article of explanation. I will write about it later.

Now you should have a zone in the 'configured' state. In summary, the typical state transition for a zone from its creation to its deletion can be depicted as follow. See man zoneadm (1M) for more information.

configured --> installed --> running
     |             |
incomplete        down
     |             |
configured        installed

2 Install the zone
Before install a zone, make sure that you have the IPS repository is configured. The zoneadm requires package from the IPS for zone installation. See this article for setting up a local IPS repository. Alternatively, you can mount the ISO image sol-11-1111-repo-full.iso directly and set-up the publisher to point directly to the file location.

# zoneadm -z webzone01 install

A ZFS file system has been created for this zone.
Progress being logged to /var/log/zones/zoneadm.20120509T131933Z.webzone01.install
       Image: Preparing at /zones/webzone01/root.

 Install Log: /system/volatile/install.3582/install_log
 AI Manifest: /tmp/manifest.xml.LCaG.g
  SC Profile: /usr/share/auto_install/sc_profiles/enable_sci.xml
    Zonename: webzone01
Installation: Starting ...

              Creating IPS image
              Installing packages from:
                  solaris
                      origin:  http://localhost:1008/solaris/5253829a2447d746e843a409669e9ab0ad8bf9f0/
DOWNLOAD                                  PKGS       FILES    XFER (MB)
Completed                              167/167 32062/32062  175.8/175.8

PHASE                                        ACTIONS
Install Phase                            44313/44313 

PHASE                                          ITEMS
Package State Update Phase                   167/167 
Image State Update Phase                         2/2 
Installation: Succeeded

        Note: Man pages can be obtained by installing pkg:/system/manual

 done.

        Done: Installation completed in 229.231 seconds.


  Next Steps: Boot the zone, then log into the zone console (zlogin -C)

              to complete the configuration process.

Log saved in non-global zone as /zones/webzone01/root/var/log/zones/zoneadm.20120509T131933Z.webzone01.install

Read the stdout carefully to ensure no error has occurred. Proceed with booting up the zone and complete the configuration as instructed.

3 Booting up
This step is accomplished with the following command

# zoneadm -z webzone01 boot

The boot process should be quick. I have not researched how a booting process can fail, if you don't see anything in stderr then your booting process has probably gone well.

A non-persistent vnic (most likely to be named after the name and interface name of your zone; example: webzone01/net0) will be created for you when the system booted so you don't need to worry about that for now. The vnic will be delete after the zone shuts down. We will explore the relationship between vnic's and zone in another article.

4 Configure the zone
Login to the zone by using this command

# zlogin -C webzone01
[Connected to zone 'webzone01' console]

You will be presented with the configuration screen as you would the global zone. Follow the steps and complete the configuration. It is a normal production practice to assign an IP address to the zone so it resides in the same subnet as the global zone. This reduces the network administration chore.


Configure the network manually. A static IP address for a web server is good for you. Don't worry about the /29 subnet, use anything you like.


No DNS for now, will be covered in another article when we hook this machine up to a Windows 2008 R2 DNS server.


Hit F2 to apply the configuration!

Upon completing the steps above, you will be presented with a login screen.

Exiting System Configuration Tool. Log is available at:

/var/tmp/install/sysconfig.log

Hostname: websvr01

May 10 00:03:27 websvr01 sendmail[7721]: My unqualified host name (websvr01) unknown; sleeping for retry
May 10 00:03:27 websvr01 sendmail[7724]: My unqualified host name (websvr01) unknown; sleeping for retry

Login using the id you supplied in one of the configuration step, perform a 'uname -a' you should see this

websvr01 console login: admin
Password:
Oracle Corporation      SunOS 5.11      11.0    November 2011
admin@websvr01:~$ uname -a
SunOS websvr01 5.11 11.0 i86pc i386 i86pc
admin@websvr01:~$

Try the ipadm and dladm command and you shall see the plumbing all done for you.

Alright, that's all for now, in the next article we will install iPlanet web server into this brand new zone.

Cheers,

Tuesday, October 11, 2011

Setting up a Solaris 11 Express Local Package Repository

As part of the exercise to upgrade my entire infrastructure from ESXi 4 to ESX 5, and adding a few Solaris Global Zones into the mix, I started with setting up a Solaris 11-based utility server. The shared, utility server is envisioned to provide the following services to other nodes in the infrastructure without introducing too many individual servers in the lab environment:

1) Local network IPS repository server for other clients
2) ZFS-based iSCSI target for other Solaris zones
3) ZFS-based NFS for shared storage in Solaris zones
4) LDAP services
5) DNS services
6) and more...

This article will address the topic of setting up a shared repository.

Pre-requisite:
- Solaris 11 Express VM. Download text installer here. I choose VMware workstation, you can obtain the entire VirtualBox image of Solaris 11 Express from Oracle website.
- Solaris 11 Express  full repository CD (sol-11-exp-201011-repo-full.iso). Download from Oracle website.

Concept
A repository is a location where clients publish and retrieve IPS packages. Clients that publish IPS packages are called publisher. A repository contains packages published by a single publisher. A repository is described by a Universal Resource Identifier (URI) such as http URL or a file location. The publisher name of all packages in the Solaris 11 Express full repository CD is 'solaris'. If you create software and publish the packages, you give yourself a publisher name, such as 'mycompany'.

A repository can be either an 'origin' or a 'mirror'.

An IPS package is a collection of software artefacts in a defined format. A package is represented by a Fault Management Resource Identifier (FMRI).

For detailed description of IPS concept, refer to Oracle documentation.

Setting up the IPS repository
In summary, the following components are required in order to setup a network based IPS repository.

- IPS Contents. We will copy all the packages from the Oracle repository CD into a local file system. You can simply create a local directory under the default ZFS pool (rpool) of your Solaris 11 Express installation. Alternatively, you can create a new ZFS pool to host the files.

In this exercise, I used the existing root file system rpool and make a directory under the root mountpoint.

root@sol11util:/rpool# cd /
root@sol11util:/# mkdir -p ips/repo
root@sol11util:/#

Copy all contents under the repo folder in the CD into the /ips/repo

root@sol11util:/# rsync -aP source dest

This is going to take a while as every files under the repo is copied.

After completion, check that the directory is there. You should see under the ips/repo the following files

root@sol11util:/ips/repo# ls -la
total 7
drwxr-xr-x 3 root root   4 2010-11-11 08:40 .
drwxr-xr-x 3 root root   3 2011-10-23 08:33 ..
-rw-r--r-- 1 root root 250 2010-11-11 08:40 pkg5.repository
drwxr-xr-x 3 root root   3 2010-11-11 08:39 publisher

- IPS server. We have the content in /ips/repo now. We need to setup a server to serve the contents of this folder to the clients on the LAN. Solaris 11 Express allows you to manage services with simple commands.

svcs - This command is used to list currently running services managed by the smf (Service Management Facility). To find out if an instance of pkg package server already running, issue the following command

root@sol11util:/tank/repo# svcs \*pkg\*
STATE          STIME    FMRI
disabled        6:48:32 svc:/application/pkg/server:default
disabled        6:48:32 svc:/application/pkg/dynamic-mirror:default
online          6:48:43 svc:/system/pkgserv:default
root@sol11util:/tank/repo#

The /application/pkg/server is not enabled by default in a fresh Solaris 11 installation. This is the service that will serve the client and provide access to the packages published by a publisher.

Let's examine this service by another command called 'svccfg'. The following command line lists all the properties of the application/pkg/server service to the console.

root@sol11util:/tank/repo# svccfg -v -s application/pkg/server listprop

pkg                                                        application
pkg/cfg_file                                               astring 
pkg/content_root                                           astring  usr/share/lib/pkg
pkg/debug                                                  astring 
pkg/file_root                                              astring 
pkg/inst_root                                              astring  /var/pkg/repo
pkg/log_access                                             astring  none
pkg/log_errors                                             astring  stderr
pkg/mirror                                                 boolean  false
pkg/pkg_root                                               astring  /
pkg/port                                                   count    80
pkg/proxy_base                                             astring 
pkg/readonly                                               boolean  true
pkg/socket_timeout                                         count    60
pkg/sort_file_max_size                                     astring 
pkg/ssl_cert_file                                          astring 
pkg/ssl_dialog                                             astring  smf
pkg/ssl_key_file                                           astring 
pkg/threads                                                count    60
pkg/writable_root                                          astring 
pkg_bui                                                    application
pkg_bui/feed_description                                   ustring 
pkg_bui/feed_icon                                          ustring  web/_themes/pkg-block-icon.png
pkg_bui/feed_logo                                          ustring  web/_themes/pkg-block-logo.png
pkg_bui/feed_name                                          ustring  "package repository feed"
pkg_bui/feed_window                                        count    24
pkg_secure                                                 application
pkg_secure/read_authorization                              astring  solaris.smf.read.pkg-server
pkg_secure/ssl_key_passphrase                              astring 
fs                                                         dependency
fs/entities                                                fmri     svc:/system/filesystem/local
fs/grouping                                                astring  require_all
fs/restart_on                                              astring  none
fs/type                                                    astring  service
autofs                                                     dependency
autofs/entities                                            fmri     svc:/system/filesystem/autofs
autofs/grouping                                            astring  optional_all
autofs/restart_on                                          astring  none
autofs/type                                                astring  service
ntp                                                        dependency
ntp/entities                                               fmri     svc:/network/ntp
ntp/grouping                                               astring  optional_all
ntp/restart_on                                             astring  none
ntp/type                                                   astring  service
network                                                    dependency
network/entities                                           fmri     svc:/milestone/network
network/grouping                                           astring  require_all
network/restart_on                                         astring  none
network/type                                               astring  service
manifestfiles                                              framework
manifestfiles/var_svc_manifest_application_pkg-server_xml  astring  /var/svc/manifest/application/pkg-server.xml
startd                                                     framework
startd/duration                                            astring  child
general                                                    framework
general/entity_stability                                   astring  Unstable
start                                                      method
start/exec                                                 astring  "%{pkg/pkg_root}/lib/svc/method/svc-pkg-depot %m"
start/timeout_seconds                                      count    0
start/type                                                 astring  method
stop                                                       method
stop/exec                                                  astring  "%{pkg/pkg_root}/lib/svc/method/svc-pkg-depot %m %{restarter/contract}"
stop/timeout_seconds                                       count    30
stop/type                                                  astring  method
tm_common_name                                             template
tm_common_name/C                                           ustring  "image packaging repository"
As you can see, this is a huge list of service properties. Fortunately, we are only interested in 2 properties, namely the pkg/inst_root and pkg/port. The default values of these properties are /var/pkg/repo and 80 respectively.

We will update the pkg/inst_root to point to /ips/repo (the local copy of the repo folder in the Solaris package CD), and the port number to an unused port 9999.

root@sol11util:/tank/repo# svccfg -v -s application/pkg/server setprop pkg/inst_root=/ips/repo

root@sol11util:/tank/repo# svccfg -v -s application/pkg/server setprop pkg/port=9999

Make sure the props are set.

root@sol11util:~# svccfg -s /application/pkg/server listprop | grep '\(port\)\|\(inst_root\)'

pkg/inst_root                                              astring  /ips/repo/
pkg/port                                                   count    9999

So far so good. We need to start the service.

root@sol11util:~# svcadm enable /application/pkg/server
root@sol11util:~# svcs /application/pkg/server
STATE          STIME    FMRI
online         16:24:28 svc:/application/pkg/server:default

The service is up, good. By now we should be able to use web browser to explore the repository from the network.


To start using this repository, we will need to set the client up to point to this repository. For now, we will set up the host to use the repository it is hosting.

Before doing that, let's see what repository is currently available to the host.

root@sol11util:/usr# pkg publisher

PUBLISHER                             TYPE     STATUS   URI

solaris                  (preferred)  origin   online   http://pkg.oracle.com/solaris/release/

Ok, we currently have an internet based Oracle repository. We are going to replace that with our local (LAN based) one.

root@sol11util:/usr# pkg set-publisher -g http://192.168.12.135:9999 -G http://pkg.oracle.com/solaris/release/ solaris

results in

root@sol11util:/usr# pkg publisher
PUBLISHER                             TYPE     STATUS   URI
solaris                  (preferred)  origin   online   http://192.168.12.135:9999/
root@sol11util:/usr# 


Rebuild the repository index

root@sol11util:~# pkg rebuild-index

Try installing firefox from this default (preferred) repository.

root@sol11util:/usr# pkg install firefox Packages to install: 15 Create boot environment: No Services to restart: 3 DOWNLOAD PKGS FILES XFER (MB) Completed 15/15 5628/5628 34.2/34.2 PHASE ACTIONS Install Phase 6514/6514 PHASE ITEMS Package State Update Phase 15/15 Image State Update Phase 2/2

That is it.

Cheers