Showing posts with label Infrastructure. Show all posts

Friday, August 10, 2012

Clone Solaris 11 Zone

I have come to a point where creating a Solaris 11 zone from scratch is no longer time efficient. This is a note about the method I employed to quickly clone a zone (either new zone or an existing zone).

If you have not created a zone before, here is a summary of the steps.

1) Login as root (or su - to root)

Create a zone ("stem" zone),

2) zonecfg -z originalzone "create; set zonepath=/zones/originalzone;set autoboot=true;exit"

if you already have an existing zone with other applications installed, and you just want to clone it lock, stock and barrel, do this

2.1) zonecfg -z clonedzone01 "create -t originalzone; set zonepath=/zones/clonedzone01;set autoboot=true;exit"

Before installing the zone, make sure you have the IPS repository configured. I use the "sol-11-1111-repo-full.iso", mount it and set the publisher to this repository.

3) pkg set-publisher -G "*" -g file:///media/SOL11REPO_FULL/repo/ solaris
4) pkg rebuild-index

Install the zone

4) zoneadm -z  originalzone install

Boot up the zone and login to the console at the same time

5) zoneadm -z  originalzone  boot; zlogin -C originalzone

If this is a new zone, once the zone booted up, and finished configuring the services, hit F9 to exit.

Run (or re-run if you have just finished configuring the a new zone) "sysconfig create-profile -o /tmp/sc_profile.xml". As you are now in the local zone, make sure you have access to the sc_profile.xml from the global zone and copy it into the global zone before you shutdown the originalzone. /tmp in the local zone maps to /zone/originalzone/root/tmp in the global zone.

Note that if you run the sysconfig utility in a fully configured zone, you will be prohibited from reusing the same user id and the computer name. I just enter a placeholder USERID for user name and COMPNAME for computer name fields. I have also used a bogus IP address during the configuration. Once the sc_profile.xml is generated, just repalce the tokens with valid values before feeding it to the zoneadm to clone the zone.


6) Shutdown the zone: zoneadm -z  originalzone halt

6.5) Replace the placeholders in the sc_profile.xml with meaningful values

# sed -e 's/USERNAME/admin/g' sc_profile.xml > sc_profile.xml.tmp && mv sc_profile.xml.tmp sc_profile.xml
# sed -e 's/COMPNAME/clonedzone/g' sc_profile.xml > sc_profile.xml.tmp && mv sc_profile.xml.tmp sc_profile.xml
# sed -e 's/55\.55\.55\.55/192\.168\.56\.62/g' sc_profile.xml > sc_profile.xml.tmp && mv sc_profile.xml.tmp sc_profile.xml

7) Clone the zone (the content of the zone).

# zoneadm -z clonedzone clone -c ~/sc_profile.xml originalzone

Progress being logged to /var/log/zones/zoneadm.20120811T004223Z.clonedzone.clone
Log saved in non-global zone as /zones/clonedzone/root/var/log/zones/zoneadm.20120811T004223Z. clonedzone.clone

If you want to find out what was done by the zoneadm util, have a look at the log file, you should notice that the tool actually performed a cloning of the originalzone zfs fs.

This also means that the size of the cloned zone starts with zero, as you make changes to the clonedzone, the size of the zfs fs will grow. Check this out

# zfs list | grep [original,cloned]zone$
NAME                                                       USED  AVAIL  REFER  MOUNTPOINT
rpool/zones/originalzone                              393M  93.4G    33K  /zones/originalzone
rpool/zones/clonedzone                               37.0M  93.4G    35K  /zones/clonedzone

Now boot the clonedzone and you will find that you do not need to perform the configuration and all local users, apps you created in the originalzone are still there.

Happy cloning!

Thursday, May 24, 2012

A basic DNS server in Windows 2008 R2

Alright, we will quickly stand up an instance of Domain Name System server in Windows 2008 R2. This is going to be an internal DNS server meant to be the master for all internal zones and hosts records. At this point, we are also not integrating this DNS with the Active Directory Domain Services. There will not be caching, no forwarding nor is it located in the DMZ. The DNS server could however support the access from the internal facing web tier through a forwarder.

Under Windows 2008 R2, majority of the services are exposed via a construct called 'Role'. Each role  encompasses one or more role services, and their corresponding database, collectively delivers a capability commonly required in an enterprise infrastructure. For example, the Remote Desktop Services role, comprised of a set of services such as Remote Desktop Session Host, Remote Desktop Gateway, Remote Desktop Web Access and others which can be optionally included.

In the case of DNS, the role contains only one role service, that is the Domain Name Service.

For the sake of completeness, first make sure we have assigned a static IP address to the Windows 2008 R2 server. If you server is multi homed, you need to ensure every network interface is configured with static IP address.

To install DNS server, we start with installing the DNS role using the Server Manager Management Console.

Steps to add DNS role in Windows 2008 R2
1) In the run menu, enter ServerManager.msc and press enter. A MMC (Microsoft Management Console) will be launched.


2) Under the 'Roles' node in the tree, click 'Add Role'.


3) Check the 'DNS Server' role and click 'Next'


4) If you want to learn more about DNS, read all text and links provided in this page. They are sufficient to provide a good overview of DNS offering in Windows 2008 R2 platform. Click 'Next' if you are in a hurry.


5) Click 'Install' and when the installation finish successfully, click on 'Close'.


6) You will see in the Server Manager console the installed role and the DNS server status.


After the DNS role is installed, you will be able to create a DNS zone that fits your administrative purpose. In our example, I will create a zone call web host zone and the TLD is lab.keinjuan.com.au.


7) Click on 'Go to DNS server' to further configure the service.


8) Expand the tree menu to get to the 'Forward Lookup Zones' leave. Right click and select the 'New Zone...' sub-menu. A wizard will show itself.


9) Click 'Next', select 'Primary Zone', and click 'Next' again to specify a zone name. You will have to make one up. For a flat namespace, not much thought is needed. I have chosen the following naming:

in.lab.keinjuan.org


Short explanation:
  • The 'in' part refers to 'internal' or my intranet.
  • The 'lab' indicates that this is part of my laboratory. I may have something in the future call 'kitch' for my kitchen appliances such as rice cooker, fridge and so forth. Or I will omit it for my real 'production' elements.
  • The 'keinjuan.org' is my unofficial domain name. Doesn't not exist on the internet, doesn't matter.


10) Accept the default 'Do not allow dynamic update'. We don't need that sophistication, we will add the DNS entries manually through the console.


11) Finally click on the 'Finish' button to start installation.


12) Upon the completion, the Server Manager console will display the status of the new DNS you have just created.


Lets add some A type records to resolve our iPlanet webserver and the global zone it resides in. The hostnames and their corrresponding IPv4 IP addresses are as follow:

13) Right click on the newly created forward lookup zone (in.lab.keinjuan.org)


14) In the dialog box, enter the host name in the 'Name' field, and the corresponding IP address in the 'IP address' field. If you enter an IPv4 IP address here, you will get a 'A' record, and a 'AAAA' record when you entered a valid IPv6 address.


I have configure a test IPv6 AAAA record and 2 'A' records for the Solaris global zone as well as the local zone.

15) Test your DNS server by querying the entries using nslookup command from the command prompt, in the DNS box itself. This does not require a connectivity to the hostname being queried at this point of time. Just make sure your DNS server entry in the IP configuration of your server is 127.0.0.1 (localhost).


The nslookup results for each records in the DNS.


C:\Users\Administrator.DC-PRIM>nslookup websvr-g01.in.lab.keinjuan.org
Server:  localhost
Address:  127.0.0.1

Name:    websvr-g01.in.lab.keinjuan.org
Address:  192.168.1.2

C:\Users\Administrator.DC-PRIM>nslookup websvr01.in.lab.keinjuan.org
Server:  localhost
Address:  127.0.0.1

Name:    websvr01.in.lab.keinjuan.org
Address:  192.168.1.3

C:\Users\Administrator.DC-PRIM>nslookup anIPv6Host.in.lab.keinjuan.org
Server:  localhost
Address:  127.0.0.1

Name:    anIPv6Host.in.lab.keinjuan.org
Address:  2001:db8:85a3::8a2e:370:7334


You can also create a reverse lookup zone for the PTR record so you can lookup the hostname by IP address. Play with it.

That is all. In the next article we will look at hooking up the websvr-g01 and websvr01 to this DNS server and browser the webserver using the hostname from the DNS server.

Cheers,


Monday, February 14, 2011

A Virtual Lab on ESXi in a VMWare Workstation Guest

Alright, have been away for too long. I am still here.

In this article, we will look at a basic infrastructure where we can deploy our filegateway, or anything for that matter. It is a very basic infrastructure architecture. It is definitely no production environment, but is built to have the potential to become one. As we go, we should be able to easily add firewall, load balancer, SSL offloader, redundancy/FT, application clusters, Oracle RAC, monitoring, security and connect it with another LAN with IPSec. Hopefully we will be able to play with many application features in this platform. A DMZ within this virtual infrastructure is certainly possible without significant re-design.

The logical view of the network infrastructure.


Due to limited budget, this environment has been built in an ESXi host within a VM on a Windows 7 64-bit host. Physical switch has been replaced with a vSwitch and the uplink is simulated by a port in a Vyatta Router VM.

The ESXi view of the network and guest OS'es.

ESXi Virtual Network

The Infrastructure Explained
- VLAN
There are 3 VLAN's.
  • MSG_VLAN - As the name suggest, this is for the TIBCO EMS traffics.
  • DB_VLAN - The database network.
  • APP_VLAN - The VLAN for TIBCO BW and the Admin Server. The oracle fusion server will also be deployed on this network.
Each VLAN, except DB_VLAN has it's own DHCP server at the moment. It should be trivial to configure DHCP relay into the Vyatta Router so that only one DHCP is required.

- SWITCH (vS1)
This is a layer 2 access layer switch that provides VLAN and has an 'uplink' that connects to a VLAN trunk in another Layer 3 router. The vSwitch does not do VLAN routing.

- ROUTER (vR1)
This router provides a link to our 'external world', which is our host machine. The router provides inter VLAN routing, NAT and firewall (disabled for now). It has an interface that is configured to support 802.1q VLAN trunking. Outgoing traffics are routed to vR0 for internet access. This route also provide access to the APP_VLAN from the Host machine.

Update: The Vyatta configuration details for vR1 is now available here.

- ROUTER (vR0)
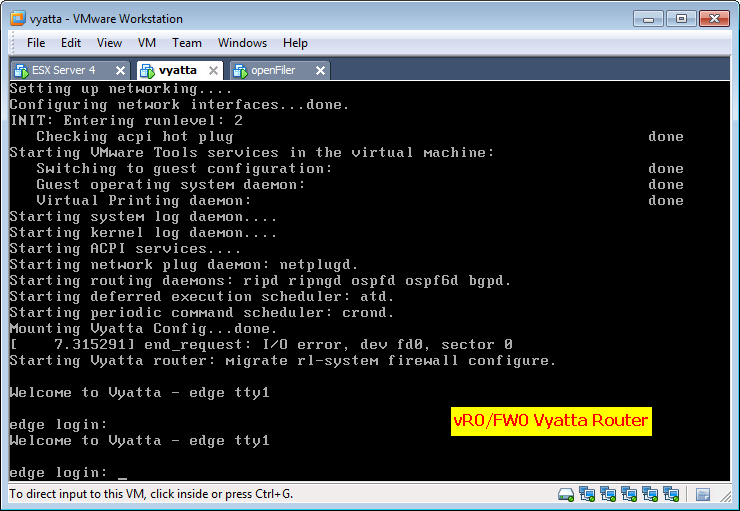
vR1 does not have direct connectivity to the internet. This router provides limited access to the internet from VLAN's and the PROD_LAN. In my Lab, I have another notebook that acts as Internet Connection Sharing (ICS) host. Note the IP address 192.168.0.1 as dictated by Microsoft. This router also eliminate my problem of the ICS side effect where the domain name of every PC connected to 192.168.0.0/24 become mshome.net after ICS is turned on.

Update: The Vyatta configuration details for vR0 is now available here.

- NFS_LAN
This is an IP network that carries all NFS traffics to/from the esx host. For the sake of simplicity, the NAS also provides storage to all VM's within the host. The storage type includes iSCSI (for VMSTORE) and NFSv3, for all other VM's, primary for application data, database cluster and logging. The NAS implementation is provided by OpenFiler.

- Connectivity
All inter VLAN traffics are routed by the layer 3 router on a stick (implemented in Vyatta virtual appliance, vR1).

- Security/Isolation
All VLAN's defined within the Switch are isolated, effectively defining the broadcast boundaries. Routing between the VLAN (Inter VLAN) is performed by the Router connected to the (virtual) uplink port of the switch. Communication between different tiers (MSG, APP, DB) could be firewalled if required.

Access to the Virtual Lab from the Host machine is limited only to the APP_VLAN. Hosts on the MSG_VLAN and DB_VLAN can only be accessed from the hosts within the APP_VLAN.

To provide further clarity, the following images are of the 3 core VMware guest OS'es that make up the ESXi Infrastructure sitting on a Windows 7 host. The rest are in the ESXi 'host'.

ESXi 'host' as a VMware Workstation guest

OpenFiler iSCSI & NAS as a VMware guest

vR0/FW0 as the 'edge router' into the internet.
Cheers.